

搜索到
5
篇与
的结果
-
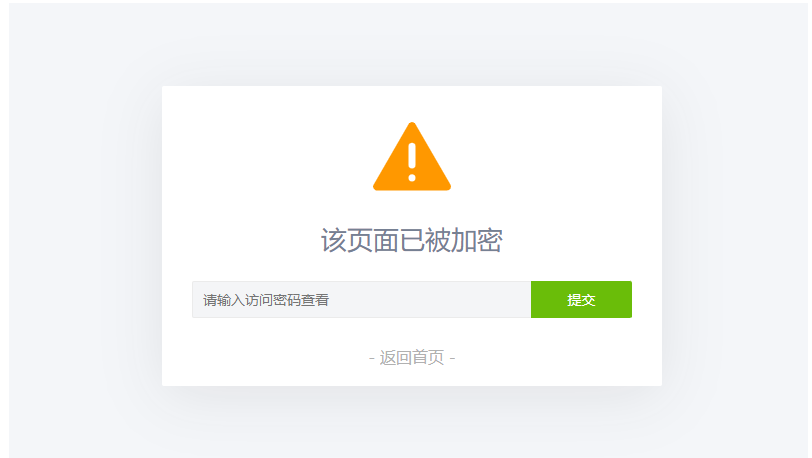
 给PHP页面设置访问密码,PHP页面怎么设置页面访问密码 为你的页面支持加密访问无论什么程序只要是PHP程序都是支持这代码的,来实现加密访问你的加密页面或文章等等的页面,不保证其他程序可以正常使用麻烦先测试! 密码正确才能进去页面,进入后会存下cookies值,下一次登录的时候则不需要再次输入了。如果不想给人看了,只需要更改密码,cookies就会立即失效,必须要重新登陆才能看。安装方法:1、新建PHP文件,命名为:mima.php,把下面代码放进这个新建为PHP文件里面<?php /** * 使用说明: * 1. 将本脚本保存为 PageEncrypt.php。 * 2. 在您想要加密的PHP页面开头包含这个文件: * require_once('PageEncrypt.php'); * 3. 设置页面访问密码: * PageEncrypt('页面密码'); */ // 定义密码Cookie加密盐,若未定义则设置默认值 if (!defined('MK_ENCRYPT_SALT')) { define('MK_ENCRYPT_SALT', 'Kgs$JC!V'); } /** * 设置页面访问密码 * @param string $password 访问密码 * @param string $pageid 页面唯一ID,用于区分同一网站的不同加密页面,默认为'default' */ function PageEncrypt($password, $pageid = 'default') { // 生成页面ID并进行MD5加密 $pageid = md5($pageid); // 对密码进行双重MD5加密,并附加盐值 $md5pw = md5(md5($password) . MK_ENCRYPT_SALT); // 获取POST提交的密码,若不存在则设为空字符串 $postpwd = filter_input(INPUT_POST, 'pagepwd', FILTER_SANITIZE_STRING); // 获取Cookie中保存的密码,若不存在则设为空字符串 $cookieName = 'mk_encrypt_' . $pageid; $cookiepwd = filter_input(INPUT_COOKIE, $cookieName, FILTER_SANITIZE_STRING); // 如果Cookie中的密码匹配,则直接返回 if (hash_equals($md5pw, $cookiepwd)) { return; } // 如果提交的密码正确,则设置Cookie并返回 if (hash_equals($md5pw, md5(md5($postpwd) . MK_ENCRYPT_SALT))) { setcookie($cookieName, $md5pw, time() + 3600000, '/'); return; } // 密码验证失败,显示密码输入页面 header('Content-Type: text/html; charset=UTF-8'); ?> <!DOCTYPE html> <html lang="zh-CN"> <head> <meta charset="UTF-8"> <meta http-equiv="X-UA-Compatible" content="IE=edge"> <meta name="viewport" content="width=device-width, initial-scale=1.0"> <title>该页面已被加密</title> <style type="text/css"> *{font-family:"Microsoft Yahei",微软雅黑,"Helvetica Neue",Helvetica,"Hiragino Sans GB","WenQuanYi Micro Hei",sans-serif;box-sizing:border-box;margin:0px;padding:0px;font-size:14px;-webkit-transition:.2s;-moz-transition:.2s;-ms-transition:.2s;-o-transition:.2s;transition:.2s} html,body{width:100%;height:100%} body{background-color:#F4F6F9;color:#768093} input,button{font-size:1em;border-radius:3px;-webkit-appearance:none} input{width:100%;padding:5px;box-sizing:border-box;border:1px solid #e5e9ef;background-color:#f4f5f7;resize:vertical} input:focus{background-color:#fff;outline:none} button{border:0;background:#6abd09;color:#fff;cursor:pointer;opacity:1;user-select:none} button:hover,button:focus{opacity:.9} button:active{opacity:1} .main{width:100%;max-width:500px;height:300px;padding:30px;background-color:#fff;border-radius:2px;box-shadow:0 10px 60px 0 rgba(29,29,31,0.09);transition:all .12s ease-out;position:absolute;left:0;top:0;bottom:0;right:0;margin:auto;text-align:center} .alert{width:80px} .mk-side-form{margin-bottom:28px} .mk-side-form input{float:left;padding:2px 10px;width:77%;height:37px;border:1px solid #ebebeb;border-right-color:transparent;border-radius:2px 0 0 2px;line-height:37px} .mk-side-form button{position:relative;overflow:visible;width:23%;height:37px;border-radius:0 2px 2px 0;text-transform:uppercase} .pw-tip{font-weight:normal;font-size:26px;text-align:center;margin:25px auto} #pw-error {color: red;margin-top: 15px;margin-bottom: -20px;} .return-home{text-decoration:none;color:#b1b1b1;font-size:16px} .return-home:hover{color:#1E9FFF;letter-spacing:5px} </style> </head> <body> <div class="main"> <svg class="alert" viewBox="0 0 1084 1024" xmlns="http://www.w3.org/2000/svg" width="80" height="80"> <defs><style/></defs> <path d="M1060.744 895.036L590.547 80.656a55.959 55.959 0 0 0-96.919 0L22.588 896.662a55.959 55.959 0 0 0 48.43 83.907h942.14a55.959 55.959 0 0 0 47.525-85.534zm-470.619-85.172a48.008 48.008 0 1 1-96.015 0v-1.567a48.008 48.008 0 1 1 96.015 0v1.567zm0-175.345a48.008 48.008 0 1 1-96.015 0V379.362a48.008 48.008 0 1 1 96.015 0v255.157z" fill="#FF9800"/> </svg> <form action="" method="post" class="mk-side-form"> <h2>该页面已被加密</h2> <input type="password" name="pagepwd" placeholder="请输入访问密码查看" required> <button type="submit">提交</button> <?php if ($postpwd): ?> <p id="pw-error">哎哟!密码不对哦~</p> <script>setTimeout(function() {document.getElementById('pw-error').style.display = 'none';}, 2000);</script> <?php endif; ?> </form> <a href="/" class="return-home">- 返回首页 -</a> </div> </body> </html> <?php exit(); } ?>2、把下面的代码放进你要加密的PHP页面里面,比如你要给首页:index.php 加密,就把下面代码放在index.php 的最前面<?php require_once('PageEncrypt.php'); PageEncrypt('1234');//这个就是密码 ?>20260127:Update: 重构页面加密脚本至 Ultimate 版本Security: 替换 MD5 为 HMAC-SHA256;增加 Cookie HttpOnly/Secure 属性;新增防暴力破解锁定机制(5次/15分钟)。Feat: 新增注销功能 (?action=logout);支持 Config 数组动态配置;解决表单重复提交问题。UI: 全新 Glassmorphism 毛玻璃风格界面,增加动态背景与交互动画,优化移动端显示。Fix: 修复 PHP 8.1+ FILTER_SANITIZE_STRING 弃用警告。<?php /** * PageEncrypt Ultimate - 全功能单页加密脚本 * 集成功能:防暴力破解、自动注销、动态配置、HMAC加密 * * 使用方法: * require_once('PageEncrypt.php'); * PageEncrypt('你的密码', [ * 'page_id' => 'my_private_page', * 'title' => '内部数据', * ]); */ // 默认加密盐 (建议在引用此文件前定义该常量,或者直接修改此处) if (!defined('MK_ENCRYPT_SALT')) { define('MK_ENCRYPT_SALT', 'Change_This_To_Something_Random_&_Complex_999'); } /** * 核心加密函数 * @param string $password 访问密码 * @param array $options 配置数组 */ function PageEncrypt($password, $options = []) { // 1. 初始化配置 $defaults = [ 'page_id' => 'default', // 页面ID,用于区分不同页面 'title' => '访问受限', // 页面标题 'cookie_time' => 86400 * 7, // Cookie有效期 (默认7天) 'max_attempts' => 5, // 最大尝试次数 'lockout_time' => 900, // 锁定时间 (秒),默认15分钟 'logout_param' => 'logout' // 触发退出的URL参数名 (?action=logout) ]; $config = array_merge($defaults, $options); // 生成唯一标识 $pageIdHash = md5($config['page_id']); $cookieName = 'mk_encrypt_' . $pageIdHash; $sessionKey = 'mk_encrypt_limit_' . $pageIdHash; // 开启 Session (用于防爆破) if (session_status() === PHP_SESSION_NONE) { session_start(); } // 计算正确密码的哈希 (HMAC-SHA256) $correctHash = hash_hmac('sha256', $password, MK_ENCRYPT_SALT); // 2. 处理退出登录逻辑 // 访问方式: yourpage.php?action=logout if (isset($_GET['action']) && $_GET['action'] === $config['logout_param']) { setcookie($cookieName, '', time() - 3600, '/'); // 清除Cookie // 清除URL参数并跳转回原页面 $cleanUrl = strtok($_SERVER["REQUEST_URI"], '?'); header("Location: " . $cleanUrl); exit(); } // 3. 检查防暴力破解限制 $attempts = $_SESSION[$sessionKey]['count'] ?? 0; $lastTime = $_SESSION[$sessionKey]['time'] ?? 0; $isLocked = false; if ($attempts >= $config['max_attempts']) { if (time() - $lastTime < $config['lockout_time']) { $isLocked = true; $remainingTime = ceil(($config['lockout_time'] - (time() - $lastTime)) / 60); $errorMsg = "尝试次数过多,请 {$remainingTime} 分钟后再试。"; } else { // 锁定时间已过,重置计数 unset($_SESSION[$sessionKey]); $attempts = 0; } } // 4. 验证 Cookie (如果未锁定) if (!$isLocked) { $cookiePwd = $_COOKIE[$cookieName] ?? ''; if (!empty($cookiePwd) && hash_equals($correctHash, $cookiePwd)) { // 验证通过,重置错误计数并返回 unset($_SESSION[$sessionKey]); return; } } // 5. 处理 POST 提交 (如果未锁定) if (!$isLocked && $_SERVER['REQUEST_METHOD'] === 'POST') { $inputPwd = $_POST['pagepwd'] ?? ''; // 验证密码 if (hash_equals($correctHash, hash_hmac('sha256', $inputPwd, MK_ENCRYPT_SALT))) { // 密码正确 setcookie($cookieName, $correctHash, [ 'expires' => time() + $config['cookie_time'], 'path' => '/', 'secure' => isset($_SERVER['HTTPS']) && $_SERVER['HTTPS'] === 'on', 'httponly' => true, 'samesite' => 'Strict' ]); // 登录成功,清空错误计数 unset($_SESSION[$sessionKey]); // 刷新页面 header("Location: " . strtok($_SERVER["REQUEST_URI"], '?')); exit(); } else { // 密码错误:记录次数 $_SESSION[$sessionKey] = [ 'count' => $attempts + 1, 'time' => time() ]; $errorMsg = "密码错误!剩余尝试次数: " . ($config['max_attempts'] - ($attempts + 1)); // 如果刚才是最后一次尝试,立即显示锁定 if (($attempts + 1) >= $config['max_attempts']) { $errorMsg = "尝试次数过多,已被锁定。"; $isLocked = true; } } } // 6. 渲染登录界面 // 如果执行到这里,说明没有通过验证,显示登录框并终止脚本 renderLoginForm($config['title'], $errorMsg ?? null, $isLocked); exit(); } /** * 渲染 HTML 界面 (Modern Glass UI) */ function renderLoginForm($title, $errorMsg, $isLocked) { header('Content-Type: text/html; charset=UTF-8'); ?> <!DOCTYPE html> <html lang="zh-CN"> <head> <meta charset="UTF-8"> <meta name="viewport" content="width=device-width, initial-scale=1.0, maximum-scale=1.0, user-scalable=no"> <title><?php echo htmlspecialchars($title); ?></title> <style> :root { --glass-bg: rgba(255, 255, 255, 0.75); --glass-border: rgba(255, 255, 255, 0.6); --primary-color: #4f46e5; --primary-hover: #4338ca; --text-main: #1f2937; --text-sub: #6b7280; --error-bg: #fee2e2; --error-text: #ef4444; } * { margin: 0; padding: 0; box-sizing: border-box; font-family: -apple-system, BlinkMacSystemFont, "Segoe UI", Roboto, "Helvetica Neue", Arial, sans-serif; } body { height: 100vh; width: 100%; display: flex; align-items: center; justify-content: center; /* 动态渐变背景 */ background: linear-gradient(-45deg, #ee7752, #e73c7e, #23a6d5, #23d5ab); background-size: 400% 400%; animation: gradientBG 15s ease infinite; overflow: hidden; } @keyframes gradientBG { 0% { background-position: 0% 50%; } 50% { background-position: 100% 50%; } 100% { background-position: 0% 50%; } } .container { position: relative; width: 100%; max-width: 420px; padding: 20px; } .glass-card { background: var(--glass-bg); backdrop-filter: blur(16px); -webkit-backdrop-filter: blur(16px); border: 1px solid var(--glass-border); border-radius: 24px; padding: 40px 32px; box-shadow: 0 8px 32px rgba(0, 0, 0, 0.1); text-align: center; transition: transform 0.3s ease; } .icon-wrapper { width: 64px; height: 64px; background: rgba(79, 70, 229, 0.1); border-radius: 50%; display: flex; align-items: center; justify-content: center; margin: 0 auto 20px; } .icon-wrapper svg { width: 32px; height: 32px; color: var(--primary-color); } h1 { font-size: 24px; font-weight: 700; color: var(--text-main); margin-bottom: 8px; letter-spacing: -0.5px; } p.subtitle { font-size: 14px; color: var(--text-sub); margin-bottom: 32px; } .input-group { position: relative; margin-bottom: 20px; } input { width: 100%; padding: 14px 16px; padding-left: 44px; border: 2px solid transparent; background: rgba(255, 255, 255, 0.6); border-radius: 12px; font-size: 16px; color: var(--text-main); transition: all 0.3s ease; outline: none; } input:focus { background: #fff; border-color: var(--primary-color); box-shadow: 0 0 0 4px rgba(79, 70, 229, 0.1); } input:disabled { background: #e5e7eb; cursor: not-allowed; } .input-icon { position: absolute; left: 14px; top: 50%; transform: translateY(-50%); color: #9ca3af; width: 20px; height: 20px; } input:focus + .input-icon { color: var(--primary-color); } button { width: 100%; padding: 14px; background: var(--primary-color); color: white; border: none; border-radius: 12px; font-size: 16px; font-weight: 600; cursor: pointer; transition: all 0.2s ease; box-shadow: 0 4px 6px -1px rgba(79, 70, 229, 0.2); } button:hover:not(:disabled) { background: var(--primary-hover); transform: translateY(-1px); box-shadow: 0 6px 8px -1px rgba(79, 70, 229, 0.3); } button:active:not(:disabled) { transform: translateY(0); } button:disabled { background: #9ca3af; cursor: not-allowed; opacity: 0.8; box-shadow: none; } .error-message { margin-top: 16px; padding: 10px; background: var(--error-bg); color: var(--error-text); font-size: 14px; border-radius: 8px; display: flex; align-items: center; justify-content: center; gap: 6px; animation: shake 0.5s cubic-bezier(.36,.07,.19,.97) both; } .footer { margin-top: 24px; font-size: 13px; } .footer a { color: var(--text-sub); text-decoration: none; transition: color 0.2s; } .footer a:hover { color: var(--primary-color); text-decoration: underline; } @keyframes shake { 10%, 90% { transform: translate3d(-1px, 0, 0); } 20%, 80% { transform: translate3d(2px, 0, 0); } 30%, 50%, 70% { transform: translate3d(-4px, 0, 0); } 40%, 60% { transform: translate3d(4px, 0, 0); } } /* 移动端优化 */ @media (max-width: 480px) { .glass-card { padding: 32px 24px; } h1 { font-size: 22px; } } </style> </head> <body> <div class="container"> <div class="glass-card"> <div class="icon-wrapper"> <svg viewBox="0 0 24 24" fill="none" stroke="currentColor" stroke-width="2" stroke-linecap="round" stroke-linejoin="round"> <rect x="3" y="11" width="18" height="11" rx="2" ry="2"></rect> <path d="M7 11V7a5 5 0 0 1 10 0v4"></path> </svg> </div> <h1><?php echo htmlspecialchars($title); ?></h1> <p class="subtitle">此页面内容受密码保护</p> <form method="post"> <div class="input-group"> <input type="password" name="pagepwd" placeholder="请输入访问密码" <?php echo $isLocked ? 'disabled' : 'autofocus'; ?> required autocomplete="current-password"> <svg class="input-icon" viewBox="0 0 24 24" fill="none" stroke="currentColor" stroke-width="2" stroke-linecap="round" stroke-linejoin="round"> <path d="M21 2l-2 2m-7.61 7.61a5.5 5.5 0 1 1-7.778 7.778 5.5 5.5 0 0 1 7.777-7.777zm0 0L15.5 7.5m0 0l3 3L22 7l-3-3m-3.5 3.5L19 4"></path> </svg> </div> <button type="submit" <?php echo $isLocked ? 'disabled' : ''; ?>> <?php echo $isLocked ? '暂时锁定' : '立即查看'; ?> </button> <?php if ($errorMsg): ?> <div class="error-message"> <svg width="16" height="16" viewBox="0 0 24 24" fill="none" stroke="currentColor" stroke-width="2" stroke-linecap="round" stroke-linejoin="round"> <circle cx="12" cy="12" r="10"></circle> <line x1="12" y1="8" x2="12" y2="12"></line> <line x1="12" y1="16" x2="12.01" y2="16"></line> </svg> <span><?php echo htmlspecialchars($errorMsg); ?></span> </div> <?php endif; ?> </form> <div class="footer"> <a href="/">← 返回首页</a> </div> </div> </div> </body> </html> <?php } ?>Ultimate版本基础用法跟原来一样,只需要一行密码即可,其他使用默认配置。<?php require_once('PageEncrypt.php'); PageEncrypt('mypassword123'); // 默认配置:5次机会,锁定15分钟 ?> <h1>欢迎访问加密页面</h1>高级用法:自定义标题和限制如果你想修改标题,或者让密码试错机会更多/更少。<?php require_once('PageEncrypt.php'); PageEncrypt('super_secret_pw', [ 'page_id' => 'admin_dashboard', // 必须设置,用于区分 Session 'title' => '管理员后台 - 请登录', 'max_attempts' => 3, // 只能错3次 'lockout_time' => 300, // 锁定 5 分钟 (300秒) 'cookie_time' => 3600 // 登录有效期 1 小时 ]); ?>如何添加“退出登录”按钮在你的加密页面内容中,添加一个链接即可:<h1>内部资料</h1> <p>这里是机密内容...</p> <a href="?action=logout" style="color: red;">[退出登录]</a>
 -
使用企业微信API获取个人微信的openid实现用户鉴权!无需认证公众号!完全免费! 在微信中,需要鉴别用户身份的常用做法是什么?当然是微信授权,获取用户的openid进行确认身份。如果是h5网页,那么需要使用微信公众号提供的网页授权接口实现,如果是小程序那就好办,个人小程序的 wx.login 接口也可以获取openid,那么问题来了,微信公众号提供的网页授权只有认证的服务号才有权限,个人根本没机会使用,这便是门槛。但是我发现,企业微信的接口,个人也可以使用网页授权链接实现获取用户的openid,即便你的网页不是在企业微信环境下使用,也是可以获取到用户的openid,本次文章就是我要实现的。准备1、登录企业微信;2、创建一个应用;3、创建完毕之后,进入应用,获取 AgentId 和 Secret4、获取 appid以上3个参数准备好,就可以用代码实现了。getCode.php<?php // 获取访问令牌的函数 function getAccessToken($corpid, $corpsecret) { $url = "https://qyapi.weixin.qq.com/cgi-bin/gettoken?corpid=$corpid&corpsecret=$corpsecret"; $response = file_get_contents($url); $data = json_decode($response, true); if(isset($data['access_token'])) { return $data['access_token']; } else { // 处理错误 return false; } } // 从数组中检索访问令牌的函数 function getCachedAccessToken() { if(file_exists('access_token.php')) { include 'access_token.php'; return $access_token_data['access_token']; } else { // 如果文件不存在,返回空字符串 return ''; } } // 检查访问令牌是否过期的函数 function isAccessTokenExpired() { if(file_exists('access_token.php')) { include 'access_token.php'; return $access_token_data['expires_at'] < time(); } else { // 如果文件不存在,返回 true 表示过期 return true; } } // 将访问令牌保存到数组中的函数 function saveAccessToken($access_token) { $access_token_data = array( 'access_token' => $access_token, // 设置访问令牌 'expires_at' => time() + 7200 // 设置过期时间为2小时后 ); file_put_contents('access_token.php', '<?php $access_token_data = ' . var_export($access_token_data, true) . ';'); } // 你的企业微信 API 凭证 $corpid = '你的企业微信appid'; $corpsecret = '你的企业微信所创建的应用的Secret'; // 检查访问令牌是否过期或未缓存 if(isAccessTokenExpired()) { // 从企业微信 API 获取新的访问令牌 $access_token = getAccessToken($corpid, $corpsecret); if($access_token) { // 将访问令牌保存到数组中 saveAccessToken($access_token); } else { // 处理错误 die("从企业微信 API 获取访问令牌失败。"); } } // 获取用户信息 function getUserInfo($access_token, $code) { $url = "https://qyapi.weixin.qq.com/cgi-bin/auth/getuserinfo?access_token=$access_token&code=$code"; $response = file_get_contents($url); $data = json_decode($response, true); return $data; } // 从数组中检索访问令牌 $access_token = getCachedAccessToken(); // code $code = $_GET['code']; $userInfo = getUserInfo($access_token, $code); if($userInfo['errcode'] == 0) { // 判断当前是userid还是openid if($userInfo['userid']) { // userid $openid = $userInfo['userid']; }else { // openid $openid = $userInfo['openid']; } // 跳转到展示页面 echo '<script>location.href="showOpenid.php?openid='.$openid.'";</script>'; }else { // 错误 echo $userInfo['errmsg']; } ?> <meta name="viewport" content="width=device-width,initial-scale=1.0,maximum-scale=1.0,user-scalable=0,viewport-fit=cover">以上代码两处需要配置,这两处已经在上面准备阶段获取到了。// 你的企业微信 API 凭证 $corpid = '你的企业微信appid'; $corpsecret = '你的企业微信所创建的应用的Secret';showOpenid.php<html> <head> <title>展示页面</title> <meta name="viewport" content="width=device-width,initial-scale=1.0,maximum-scale=1.0,user-scalable=0,viewport-fit=cover"> </head> <body> <p style="width:90%;margin: 50px auto 0;text-align:center;padding:20px 5px;border:2px dashed #ccc;"> <?php echo $_GET['openid']; ?> </p> </body> </html>以上两个php文件上传至你服务器即可。例如你的域名是:https://www.qq.com你将 getCode.php 和 showOpenid.php 上传至根目录下的 Auth 目录。那么继续往下看:构造网页授权链接根据官方API文档可知:构造格式如下:https://open.weixin.qq.com/connect/oauth2/authorize?appid=CORPID&redirect_uri=REDIRECT_URI&response_type=code&scope=snsapi_base&state=STATE&agentid=AGENTID#wechat_redirectCORPID: 替换为你的appidredirect_uri: 替换为getCode.php页面的链接AGENTID: 替换为你的AgentId假设你的CORPID是:ww1f1289a1254d49b2假设你的AGENTID是:1000002最终的网页授权链接如下:https://open.weixin.qq.com/connect/oauth2/authorize?appid=ww1f1289a1254d49b2&redirect_uri=https://www.qq.com/Auth/getCode.php&response_type=code&scope=snsapi_base&state=STATE&agentid=1000002#wechat_redirect还要去配置一下网页授权的域名(应用管理点进去往下拉-网页授权及JS-SDK)配置完授权域名后,也要配置信任IP,不然会提示你从不被允许的IP访问将构造完成的链接发到微信:点击即可获取到openid了!注意:如果你用登录企业微信的微信扫码,可能就不是获取到openid了,而是获取到userid,因为文档说了,当用户为企业成员时(无论是否在应用可见范围之内)返回示例如下:所以你要测试的话得找个不是你的企业微信成员的微信进行扫码,才可以看到openid,所以这一块要注意,你以后的业务逻辑也是需要对这一块进行特殊处理。
-
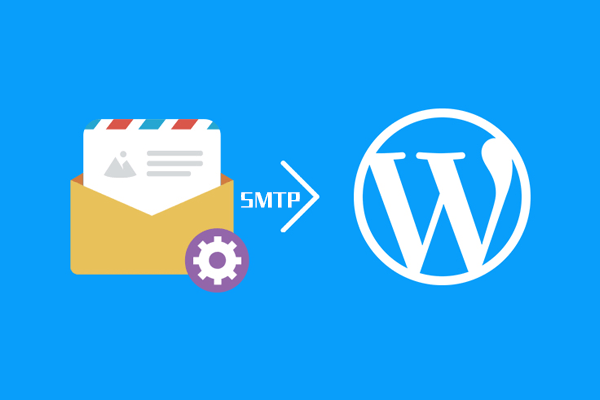
WordPress纯代码实现SMTP邮件发送功能 WordPress 本身是有集成 phpmailer, 这里只是调用 phpmailer 而已。WordPress SMTP 邮件功能的全部代码如下,修改相关参数后,直接添加到当前主题的 functions.php 文件中即可://smtp发送邮件功能 add_action('phpmailer_init', 'mail_smtp'); function mail_smtp( $phpmailer ) { $phpmailer->FromName = ''; //名字 $phpmailer->Host = ''; //smtp地址,可以到你使用的邮件设置里面找 $phpmailer->Port = 587; //端口,一般不用修改 $phpmailer->Username = ''; //邮件账号 $phpmailer->Password = ''; //邮件密码 $phpmailer->From = '';//邮件账号 $phpmailer->SMTPAuth = true; $phpmailer->SMTPSecure = 'tls'; //tls or ssl (port=25留空,465为ssl)一般不用修改 $phpmailer->IsSMTP(); }常用邮箱 SMTP 服务器阿里企业云邮箱POP3/SMTP 协议收发邮件服务器地址分别如下: 收件服务器地址: POP 服务器地址:pop3.mxhichina.com 端口110,SSL 加密端口995 发件服务器地址: SMTP 服务器地址:smtp.mxhichina.com 端口25, SSL 加密端口465 腾讯企业邮箱 POP3/SMTP 协议收发邮件服务器地址分别如下: 接收邮件服务器: POP 服务器地址:pop.exmail.qq.com (端口 110),使用SSL,端口号995 发送邮件服务器: SMTP 服务器地址:smtp.exmail.qq.com (端口 25),使用SSL,端口号465
-
PHP 判断用户是否为移动端访问 直接上代码:function wp_is_mobile() { static $is_mobile = null; if (isset($is_mobile)) { return $is_mobile; } if (empty($_SERVER["HTTP_USER_AGENT"])) { $is_mobile = false; } elseif ( strpos($_SERVER["HTTP_USER_AGENT"], "Mobile") !== false || strpos($_SERVER["HTTP_USER_AGENT"], "Android") !== false || strpos($_SERVER["HTTP_USER_AGENT"], "Silk/") !== false || strpos($_SERVER["HTTP_USER_AGENT"], "Kindle") !== false || strpos($_SERVER["HTTP_USER_AGENT"], "BlackBerry") !== false || strpos($_SERVER["HTTP_USER_AGENT"], "Opera Mini") !== false || strpos($_SERVER["HTTP_USER_AGENT"], "Opera Mobi") !== false ) { $is_mobile = true; } else { $is_mobile = false; } return $is_mobile; }
-
PHP json_encode函数的参数说明与用法 php使用json_encode()函数可以把数组,对象转化成JSON格式的字符串,用于和其它页面的数据交互。今天就说一说PHP中json_encode()函数的定义与使用方法。函数定义json_encode():可以把数组,对像转化成json格式的字符串json_encode ( value,options,depth)参数:value:要被转换的数据,可以是对象,数组或字符串options:二进制常量,规定一些要转换的字符串的形式(具体,看文未说明)depth:设置最大深度。 必须大于0。注意:depth 参数在一些文档或教材中是不存在,但在PHP官方文档中是有介绍的,在平时,不建议使用,略过即可。数组转json利用 json_encode(函数,可以很轻松的将一维数组,以及二维数组转换成 JSON 字符串,如以下的示例代码。转化一维数组示例代码:<?php // William's Blog // 一维数组转成JSON $arr = array( 'Name' => 'iyume', 'PageHome' => 'http://blog.iyume.top', ); var_dump(json_encode($arr)); ?>由于json_encode()函数返回的结果是字符串形式的,可以利用var_dump()函数来打印转化二维数组示例代码:<?php // William's Blog // 二维数组转成JSON $arr = array( 'Name' => 'iyume', 'PageHome' => 'http://blog.iyume.top', 'About' => array( 'Major' => 'PHP', 'Age' => '18', 'Address' => 'Shang Hai', ), ); var_dump(json_encode($arr)); ?>打印结果:string(113) "{"Name":"iyume","PageHome":"http:\/\/blog.iyume.top","About":{"Major":"PHP","Age":"18","Address":"Shang Hai"}}"中文不转码<?php // William's Blog $arr = array( 'Name' => '云梦', 'PageHome' => '云梦博客', ); var_dump(json_encode($arr, JSON_UNESCAPED_UNICODE)); ?>options 参数列表JSON_HEX_TAG所有的 < 和 > 转换成 \u003C 和 \u003E。 自 PHP 5.3.0 起生效。JSON_HEX_AMP所有的 & 转换成 \u0026。 自 PHP 5.3.0 起生效。JSON_HEX_APOS所有的 ' 转换成 \u0027。 自 PHP 5.3.0 起生效。JSON_HEX_QUOT所有的 " 转换成 \u0022。 自 PHP 5.3.0 起生效。JSON_FORCE_OBJECT使一个非关联数组输出一个类(Object)而非数组。 在数组为空而接受者需要一个类(Object)的时候尤其有用。 自 PHP 5.3.0 起生效。JSON_NUMERIC_CHECK将所有数字字符串编码成数字(numbers)。 自 PHP 5.3.3 起生效。JSON_PRETTY_PRINT用空白字符格式化返回的数据。 自 PHP 5.4.0 起生效。JSON_UNESCAPED_SLASHES不要编码 /。 自 PHP 5.4.0 起生效。JSON_UNESCAPED_UNICODE以字面编码多字节 Unicode 字符(默认是编码成 \uXXXX)。 自 PHP 5.4.0 起生效。连在一起可以是:echo json_encode($array, JSON_NUMERIC_CHECK | JSON_PRETTY_PRINT | JSON_UNESCAPED_UNICODE | JSON_UNESCAPED_SLASHES);